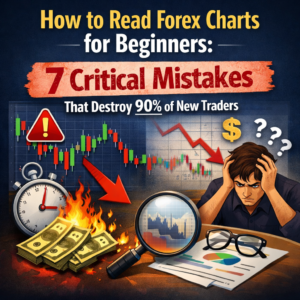
Introduction
You’ve spent countless hours perfecting your trading strategy. You’ve back-tested it, forward-tested it, and watched it produce winning trades with impressive consistency. The charts align perfectly, your indicators flash buy signals, and you’re confident this is your ticket to financial freedom.
Then reality hits.
Within weeks, maybe even days, your account balance starts hemorrhaging. The same strategy that showed such promise is now draining your capital faster than you can process what’s happening. You’re not alone in this nightmare. Statistics show that approximately 90% of retail traders lose money, and here’s the kicker: it’s rarely because their strategy was flawed.
The silent killer destroying trading accounts worldwide isn’t poor market analysis or bad trade selection, it’s the complete absence or misapplication of proper risk management in trading.
Think about that for a moment. Traders are entering the financial markets, one of the most volatile and unforgiving arenas in the world, without a safety net. It’s like going skydiving with a parachute you’ve never inspected, trusting that everything will work out simply because you studied the physics of falling.
This comprehensive guide will shatter the dangerous illusion that strategy alone can make you profitable. We’re going to explore the five critical reasons why even the most sophisticated trading strategy will fail spectacularly without robust forex risk management protocols in place. More importantly, you’ll discover exactly how to implement a risk management strategy that transforms your trading from a gambling exercise into a sustainable, professional operation.
The truth might sting, but it could also save your trading career.
Understanding Risk Management Trading: The Foundation Every Trader Needs
Before we dive into why your strategy is destined to fail without proper risk controls, let’s establish exactly what we mean by risk management trading and why it deserves your immediate attention.
What Is Risk Management in Trading?
Risk management trading is the systematic process of identifying, analyzing, and mitigating potential losses in your trading activities. It’s the comprehensive framework that determines how much capital you expose to the market on each trade, how you protect that capital, and how you ensure that a series of losses doesn’t eliminate you from the game entirely.
At its core, trading risk management addresses three fundamental questions:
- How much am I willing to lose on this single trade?
- How much total capital am I prepared to risk at any given moment?
- What mechanisms will I employ to limit losses and protect profits?
These aren’t theoretical questions, they’re survival imperatives. According to research from financial institutions, the primary differentiator between consistently profitable traders and those who fail isn’t their ability to pick winning trades. Professional traders are often right only 50-60% of the time. The real difference lies in how they manage risk when they’re wrong.
Risk Management vs Trading Strategy: The Crucial Distinction
Here’s where most traders get it catastrophically wrong: they conflate strategy with risk management, treating them as interchangeable concepts when they’re actually complementary but distinctly different disciplines.
Your trading strategy answers the question: “When and where should I enter and exit trades?” It encompasses your technical analysis, fundamental research, market timing, and the specific conditions that trigger your buy or sell decisions. Think of your strategy as your offensive game plan, how you score points.
Your risk management strategy, on the other hand, answers: “How do I protect my capital and ensure I survive to trade another day?” This is your defensive framework, the system that keeps you in the game even when your offensive plays aren’t working.
Consider this analogy: A brilliant football team with the best offensive plays in the league will still lose every game if they have no defense. The opposing team only needs to score more points than you, and without defensive players protecting your end zone, that’s inevitable. Trading works the same way. You can have the most sophisticated entry and exit strategy ever devised, but without proper risk management protocols, a few bad trades will wipe you out completely.
The Psychological Component of Trading Risk Management
Risk management isn’t just about numbers and percentages, it’s deeply psychological. When you implement robust forex risk management rules, you’re actually creating emotional stability that allows you to execute your strategy with discipline.
Without predefined risk parameters, every trade becomes an emotional rollercoaster. You’ll find yourself:
- Holding losing positions too long, hoping they’ll reverse
- Cutting winning trades too early out of fear they’ll turn against you
- Increasing position sizes after wins (overconfidence) or losses (revenge trading)
- Making impulsive decisions based on recent results rather than systematic analysis
These behavioral patterns are human nature, hardwired into our survival instincts. Risk management rules act as a circuit breaker for these destructive tendencies, removing emotion from your decision-making process.
Reason 1: Poor Risk Management Destroys Even Profitable Trading Strategies Through Position Sizing Disasters
Let’s start with the most devastating way that inadequate risk management trading practices obliterate otherwise successful strategies: catastrophic position sizing errors.
The Mathematics of Ruin
Here’s a sobering mathematical reality that every trader needs to internalize: the percentage gain required to recover from a loss is always greater than the percentage of the loss itself. And as losses increase, the recovery requirement grows exponentially.
Let me illustrate this with concrete numbers:
- If you lose 10% of your capital, you need an 11.1% gain to recover
- Lose 20%? You need a 25% gain to break even
- Lose 30%? Now you need a 42.9% gain
- Lose 50%? You need a 100% gain—doubling your remaining capital—just to get back to where you started
- Lose 75%? You need a 300% gain, which is extraordinarily difficult to achieve
This mathematical reality is why poor risk management destroys profitable trading strategies so effectively. Your strategy might win 60% of the time with an excellent risk-reward ratio, but if you’re risking 10% of your capital per trade, you’re one bad streak away from a hole so deep that even your winning strategy can’t dig you out.
The Gambler’s Ruin Problem Applied to Trading
The concept of “Gambler’s Ruin” isn’t just theoretical, it’s a proven mathematical certainty that applies directly to trading. Even with a positive expectancy (meaning your strategy wins more than it loses over time), you can still go broke if your position sizing is too aggressive relative to your account size.
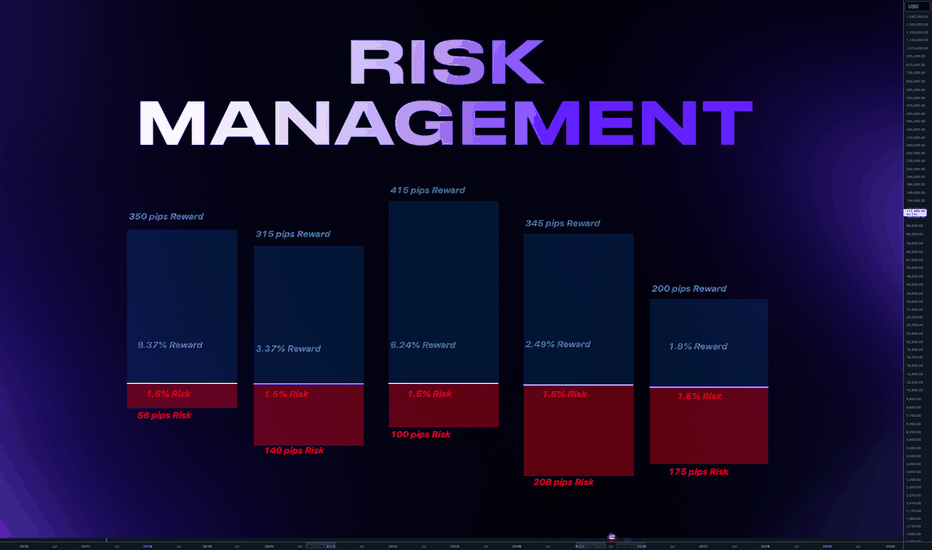
Let’s examine a real-world scenario:
Trader A has a strategy that wins 55% of the time with a 1:1.5 risk-reward ratio (risking $100 to make $150). This is actually a profitable strategy over the long term. However, Trader A risks 15% of their account on each trade. After three consecutive losses (which will happen eventually, it’s statistics), they’ve lost 45% of their capital. Now they need a 82% gain just to recover, and their position sizes have shrunk dramatically.
Trader B uses the exact same strategy but risks only 2% per trade. After three consecutive losses, they’ve lost 6% of their capital and need only a 6.4% gain to recover. They’re still in the game with 94% of their firepower intact.
Same strategy. Radically different outcomes. The difference? Forex risk management discipline.
Real Position Sizing Rules for Risk Management Trading
Professional traders follow strict position sizing formulas that many retail traders completely ignore. Here are the non-negotiable rules:
The 2% Rule
Never risk more than 2% of your total trading capital on a single trade. This is the gold standard in trading risk management, endorsed by virtually every professional trader and institution.
Why 2%? Because it allows you to survive 50 consecutive losing trades before depleting your account. While 50 losses in a row is unlikely with any decent strategy, this buffer means that realistic losing streaks of 5-10 trades barely dent your capital.
How to calculate:
- Account size: $10,000
- Maximum risk per trade: $200 (2% of $10,000)
- If your stop loss is 50 pips, your position size must be calculated so that 50 pips equals $200
The 6% Rule (Maximum Aggregate Risk)
Never have more than 6% of your total capital at risk across all open positions simultaneously. This prevents you from overexposing yourself by having multiple correlated trades running at once.
The Kelly Criterion (For Advanced Traders)
The Kelly Criterion is a mathematical formula that calculates optimal position size based on your win rate and risk-reward ratio:
Kelly % = W – [(1 – W) / R]
Where:
- W = Win rate (as a decimal)
- R = Average win / Average loss ratio
For example, with a 60% win rate (0.6) and average wins 1.5 times your average losses:
Kelly % = 0.6 – [(1 – 0.6) / 1.5] = 0.6 – 0.267 = 0.333 or 33.3%
Important: Most professionals use a fraction of the Kelly Criterion (usually 25-50% of the calculated amount) because full Kelly can be very aggressive and lead to significant drawdowns.
The Compounding Effect of Disciplined Position Sizing
Here’s where proper risk management trading transforms from defensive necessity to offensive weapon: when combined with a profitable strategy, disciplined position sizing creates compound growth that conservative approaches enable.
Consider two traders starting with $10,000:
Aggressive Trader (risking 10% per trade with a 60% win rate and 1:2 risk-reward):
- After 100 trades: Account could be anywhere from $0 to $50,000+ depending on the sequence of wins and losses
- High probability of complete account wipeout during normal losing streaks
Conservative Trader (risking 2% per trade with the same 60% win rate and 1:2 risk-reward):
- After 100 trades: Account grows steadily to approximately $15,000-18,000
- Virtually zero risk of account wipeout
- Consistent, reliable growth that compounds over time
The aggressive trader might occasionally hit spectacular gains, but they’ll eventually hit a losing streak that destroys their account. The conservative trader builds wealth systematically, sleeping soundly at night knowing that no realistic losing streak can eliminate them from the market.
Reason 2: Forex Risk Management Failures Create Emotional Trading Death Spirals
The second critical reason your strategy will fail without proper trading risk management involves the psychological devastation that poor risk controls inflict on your decision-making process.
The Emotional Cascade Effect
When you don’t have solid risk management rules in place, a single large loss triggers an emotional cascade that corrupts every subsequent trading decision. Here’s how the death spiral typically unfolds:
Stage 1: The Shocking Loss You take a position that seems promising, but you haven’t defined your risk clearly. The trade moves against you. Without a predetermined stop loss or exit plan, you hold on, hoping for a reversal. The loss grows from manageable to painful to devastating. You finally exit in panic, having lost 15%, 20%, or even 30% of your account on a single trade.
Stage 2: Emotional Disruption Your confidence shatters. You’re angry, frustrated, and desperate to recover your losses. Your rational mind knows you should follow your plan, but your emotional brain is screaming for revenge against the market.
Stage 3: Revenge Trading Instead of stepping back and analyzing what went wrong, you immediately jump into another trade, often with even larger position sizes to “make back” what you lost. This is revenge trading, and it’s one of the most destructive behaviors in all of finance. Studies on trader psychology and risk management confirm that revenge trading leads to catastrophic loss acceleration.
Stage 4: The Spiral Intensifies The revenge trade often loses too (because you’re trading emotionally, not systematically), creating an even deeper hole. Now you’re down 30%, 40%, or more. Panic sets in. You abandon your strategy entirely, making increasingly desperate trades with no coherent plan.
Stage 5: Account Detonation Within days or weeks, you’ve transformed a manageable initial loss into complete account destruction. Your strategy didn’t fail, you failed to manage risk, which triggered emotional decisions that invalidated your strategy entirely.
How Risk Management Trading Prevents Emotional Decision-Making
Robust forex risk management serves as psychological armor, protecting you from your own worst impulses. When you implement strict risk parameters:
You Remove Decision-Making Under Stress With predetermined stop losses and position sizes, you never have to make critical decisions while a trade is actively hurting you. The decision was made when you were calm and rational—before entering the trade.
You Create Psychological Safety Knowing that no single trade can seriously damage your account eliminates the fear that corrupts judgment. When you risk only 2% per trade, you can afford to be wrong. This psychological safety allows you to execute your strategy with confidence and consistency.
You Eliminate the Recovery Pressure Small, managed losses don’t create the desperate psychological need to “make it back.” You can view each trade as an independent event rather than a referendum on your abilities or a battle you must win to validate yourself.
The Confidence Paradox in Trading Risk Management
Here’s a fascinating paradox: traders who implement the strictest risk management rules often become the most confident and aggressive (in a good way) in their trading execution.
Why? Because they know their downside is protected. A professional trader risking 2% per trade with a 1:3 risk-reward ratio can take high-probability setups aggressively, knowing that even if they’re wrong, the damage is minimal and recoverable.
Compare this to the “confident” novice trader who goes all-in on trades without stop losses, convinced their analysis is infallible. This false confidence evaporates the moment the market moves against them, replaced by paralysis, fear, and ultimately, reckless decision-making.
True trading confidence comes from knowing your losses are controlled, not from believing you won’t lose.
Reason 3: Without a Risk Management Strategy, You Can’t Identify or Fix Systemic Problems
The third reason your trading strategy will fail without proper risk management in trading is more subtle but equally destructive: you’ll never know what’s actually going wrong with your trading because you can’t separate strategy problems from risk management problems.
The Diagnostic Blindness Problem
Imagine visiting a doctor who can’t take your temperature, measure your blood pressure, or run any diagnostic tests. They might guess at what’s wrong, but they’re essentially flying blind. That’s exactly what trading without proper risk management looks like, you have no diagnostic framework to identify problems.

When you implement comprehensive trading risk management, you create measurable data points that reveal exactly where your trading is breaking down:
What You Can Measure With Risk Management:
- Maximum drawdown percentage
- Win rate accuracy
- Average win vs. average loss ratio
- Consecutive losing streaks
- Risk-adjusted returns (Sharpe ratio, Sortino ratio)
- Recovery time from drawdowns
- Percentage of account at risk at any given time
What You’re Blind to Without Risk Management:
- Whether your losses stem from bad entries (strategy problem) or poor exits (risk management problem)
- If your position sizing is sabotaging an otherwise profitable approach
- How correlation between your trades is creating hidden risk
- Whether your psychological breaking point is being exceeded regularly
Case Study: The Strategy That Wasn’t Broken
Consider this real scenario that illustrates why risk management is more important than strategy in trading:
The Situation: A trader developed a breakout strategy that identified excellent entry points with a 65% win rate on historical data. However, after three months of live trading, they were down 30% on their account and concluded their strategy was flawed. They abandoned it and started searching for a new approach.
The Reality: The strategy was actually profitable. The problem was entirely risk management:
- They were setting stop losses too tight (getting stopped out before profitable moves developed)
- Position sizes varied wildly based on “conviction level” (subjective and emotional)
- They held winners for small gains but let losers run, inverting the risk-reward ratio
When they implemented consistent risk management rules—2% risk per trade, minimum 1:2 risk-reward ratio, and fixed stop-loss distances based on volatility—the same “failed” strategy became consistently profitable.
The Lesson: Without proper risk management framework, they couldn’t diagnose that their strategy was sound but their execution was destroying it. How many traders abandon perfectly good strategies because they can’t separate strategic problems from risk management failures?
Risk Management Metrics That Reveal the Truth
Professional traders track specific risk management metrics that amateur traders completely ignore. These metrics tell you exactly what’s working and what’s failing:
Maximum Drawdown
Your maximum drawdown is the largest peak-to-trough decline in your account value. This single metric tells you more about your risk management effectiveness than almost any other.
Professional Standard: Maximum drawdown should never exceed 20% of your account, and ideally stays below 15%. If you’re experiencing 30%, 40%, or 50% drawdowns, your risk management is fundamentally broken regardless of your strategy’s theoretical edge.
Risk-Adjusted Returns (Sharpe Ratio)
The Sharpe Ratio measures your returns relative to the volatility (risk) you took to achieve them. It’s calculated as:
Sharpe Ratio = (Average Return – Risk-Free Rate) / Standard Deviation of Returns
A Sharpe Ratio above 1.0 is considered good, above 2.0 is excellent, and above 3.0 is outstanding. This metric reveals whether your returns justify your risk-taking, something raw profit percentages can’t show.
Consecutive Loss Tolerance
How many consecutive losses can your account absorb before you’re psychologically or financially unable to continue? If the answer is less than 15-20 losses, your position sizing is too aggressive.
Professional forex risk management ensures you can survive extended losing streaks that will inevitably occur even with profitable strategies.
The Feedback Loop That Separates Professionals from Amateurs
When you implement rigorous risk management trading protocols, you create a feedback loop that continuously improves your performance:
- Execute trades with consistent risk parameters
- Track detailed metrics on every trade
- Analyze data to identify patterns (Are you losing more on specific pairs? Time of day? Market conditions?)
- Adjust strategy or execution based on objective data
- Implement changes and measure results
- Repeat the cycle
Without risk management, this feedback loop doesn’t exist. You’re just taking random trades with inconsistent sizing, hoping for the best, and making changes based on gut feeling rather than data.
Reason 4: Poor Risk Management Destroys Profitable Trading Strategies Through Correlation Blindness
The fourth critical failure point involves something that sophisticated traders understand intimately but novices often completely miss: the hidden risks created by correlated positions.
What Is Position Correlation in Forex Risk Management?
Correlation in trading refers to how different currency pairs, assets, or positions move in relation to each other. When positions are highly correlated, they essentially become the same trade multiple times, multiplying your risk without you realizing it.
Positive Correlation: Positions that tend to move in the same direction Negative Correlation: Positions that tend to move in opposite directions No Correlation: Positions that move independently
Here’s the dangerous trap: many traders think they’re diversifying their risk by taking multiple positions, when they’re actually concentrating risk through correlation.
The Correlation Disaster: A Real-World Example
Let’s examine how poor risk management destroys profitable trading strategies through correlation blindness:
Trader C’s “Diversified” Portfolio:
- Long EUR/USD (risking 2%)
- Long GBP/USD (risking 2%)
- Long AUD/USD (risking 2%)
- Short USD/JPY (risking 2%)
Trader C believes they have four independent trades with 8% total risk. In reality, all four positions are essentially the same trade: short USD.
When the US Dollar strengthens due to unexpected economic data, all four positions move against Trader C simultaneously. They thought they were risking 8%, but they’re actually risking nearly the full amount on what is functionally a single position. Their actual exposure is closer to 7-8% because these pairs are highly correlated.
One strong USD day can wipe out weeks of careful gains, not because their strategy failed, but because they didn’t understand or manage correlation risk.
Understanding Currency Pair Correlations
Major currency pairs exhibit predictable correlation patterns that every forex trader must understand:
Highly Correlated Pairs (Move Together):
- EUR/USD and GBP/USD (correlation often above 0.80)
- AUD/USD and NZD/USD (both commodity currencies, correlation often above 0.85)
- EUR/USD and USD/CHF (negative correlation, when one rises the other falls)
Correlation Table: Major Currency Pairs
Below is a typical correlation matrix showing how major forex pairs correlate (1.0 = perfect positive correlation, -1.0 = perfect negative correlation, 0 = no correlation):
| Pair | EUR/USD | GBP/USD | USD/JPY | AUD/USD | USD/CHF |
|---|---|---|---|---|---|
| EUR/USD | 1.00 | 0.82 | -0.68 | 0.75 | -0.94 |
| GBP/USD | 0.82 | 1.00 | -0.55 | 0.68 | -0.85 |
| USD/JPY | -0.68 | -0.55 | 1.00 | -0.52 | 0.71 |
| AUD/USD | 0.75 | 0.68 | -0.52 | 1.00 | -0.77 |
| USD/CHF | -0.94 | -0.85 | 0.71 | -0.77 | 1.00 |
Note: Correlations fluctuate based on market conditions and timeframes. These are representative examples.
How Professional Risk Management Trading Handles Correlation
Professional traders implement specific rules to prevent correlation from sabotaging their trading risk management:
Rule 1: The Correlation Adjustment Formula
When taking multiple positions, adjust your risk based on correlation:
Adjusted Risk = (Intended Risk per Trade × Number of Trades) × Correlation Coefficient
If you want to risk 2% on two trades that have 0.80 correlation:
- Adjusted Risk = (2% × 2) × 0.80 = 3.2% total risk (not 4%)
You should reduce individual position sizes so your true exposure matches your risk tolerance.
Rule 2: Maximum Correlated Exposure Limits
Set hard limits on total exposure to correlated positions:
- Never exceed 6% total risk on highly correlated positions (correlation > 0.70)
- Maximum three positions in the same currency across all pairs
- Diversify across different currency groups (EUR, GBP, JPY, commodity currencies, etc.)
Rule 3: Use Inverse Correlation Strategically
Negative correlation can actually be used to reduce overall portfolio risk when managed properly. Holding positions with negative correlation creates a natural hedge, reducing your overall volatility.
However, this must be intentional and measured, not accidental.
Beyond Forex: Correlation Across Asset Classes
Risk management strategy extends beyond individual markets. Professional traders understand correlation across asset classes:
Typical Correlation Patterns:
- Stocks and Bonds: Often negatively correlated (when stocks fall, bonds rise)
- USD and Gold: Typically negatively correlated
- Oil and CAD: Positively correlated (Canada is major oil exporter)
- Risk Sentiment: During crisis, correlations increase across all assets (everything moves together)
During market stress, correlation patterns that normally provide diversification can break down entirely, causing supposedly uncorrelated positions to move in tandem. This is why the 6% maximum aggregate risk rule is so critical—it protects you even when correlation relationships change unexpectedly.
The Correlation Reality Check
Here’s your correlation reality check: If you’re trading multiple currency pairs without checking their correlation, you don’t have a risk management strategy—you have an accident waiting to happen.
Download correlation matrices (available free from major forex brokers), update them monthly, and factor correlation into every position sizing decision. This single practice will transform your understanding of your actual risk exposure.
Reason 5: Trading Risk Management Determines Your Trading Longevity and Professional Viability
The fifth and perhaps most important reason your strategy will fail without proper risk management in trading is this: it determines whether you survive long enough to become consistently profitable.
The Survival Curve: Why Most Traders Fail Within Six Months
Research consistently shows that approximately 70-90% of retail forex traders lose money, and most quit within the first six months. The common narrative blames poor strategies, lack of education, or insufficient capital.
The reality is more nuanced: most traders fail because they run out of money or psychological resilience before their skills develop to profitability.
Think about any professional skill, surgery, architecture, law, programming. No one expects to be expert-level after six months. Trading is a complex professional endeavor that requires years to master, yet traders often expect immediate profitability.
The Survival Paradox:
- You need time to develop skills
- Time requires surviving inevitable mistakes
- Surviving mistakes requires capital preservation
- Capital preservation requires risk management
Without robust forex risk management, you won’t survive the learning curve. You’ll blow up your account during the critical development phase and quit before you ever reach profitability.
The Professional Trading Lifecycle
Understanding the typical trader development lifecycle reveals why risk management is more important than strategy in trading:
Phase 1: Unconscious Incompetence (Months 0-3) You don’t know what you don’t know. You take trades based on excitement, tips, or superficial analysis. Without risk management, this phase destroys accounts quickly.
Phase 2: Conscious Incompetence (Months 3-12) You realize how much you don’t know. You’re learning, but still making frequent mistakes. This is where most account blow-ups occur in traders who survived Phase 1. Risk management keeps you in the game during this critical learning period.
Phase 3: Conscious Competence (Year 1-3) You understand what works and can execute it, but it requires concentration and discipline. Your strategy is becoming profitable, but consistency isn’t automatic. Risk management ensures that lapses in discipline don’t undo months of progress.
Phase 4: Unconscious Competence (Year 3+) Trading becomes intuitive. You execute your strategy and risk management rules automatically, without conscious thought. You’ve internalized the principles that took years to learn.
Critical Insight: Each phase contains periods where even developing traders perform poorly. Risk management is the bridge that carries you across these performance valleys without destroying your capital or confidence.
Risk Management Rules That Ensure Trading Longevity
Professional traders follow specific trading risk management rules designed to ensure they survive long enough to master their craft:
The 50% Drawdown Circuit Breaker
If your account ever declines by 50% from its peak, you immediately stop trading with real money and return to demo or simulation trading. This rule prevents the catastrophic psychological damage that comes from deeper drawdowns.
Why 50%? Because recovering from a 50% loss requires a 100% gain—already extremely difficult. Beyond 50%, the mathematics of recovery become so daunting that most traders never psychologically recover.
The Monthly Loss Limit
Set a maximum monthly loss threshold (typically 6-10% of account value). If you hit this limit, you stop trading for the remainder of the month. This prevents a bad week from becoming a devastating month.
This rule forces you to pause, analyze what went wrong, and prevent emotional spiral trading that accelerates losses.
The Scaling Rule for Account Growth
As your account grows, your risk per trade should remain a fixed percentage (2%), but you should periodically withdraw profits. This serves two purposes:
- Realizes gains (paper profits aren’t real until realized)
- Reduces psychological pressure (knowing you’ve already secured profits reduces fear)
Many professional traders operate on a “50/50 rule”: When their account grows by 20%, they withdraw 50% of the profits and continue trading with the remainder. This ensures that even if they eventually hit a bad period, they’ve already secured real gains.
The Recovery Protocol
After any losing streak of 5+ consecutive trades, implement a recovery protocol:
- Stop trading immediately
- Review every losing trade objectively
- Identify patterns (same mistake repeated? market conditions changed?)
- Return to demo trading to rebuild confidence
- Resume live trading with 50% normal position size
- Only return to full size after 10 consecutive profitable demo trades
This protocol prevents the common pattern where traders try to “trade through” a losing streak, compounding their losses and psychological damage.
The Compound Growth That Risk Management Enables
Here’s the beautiful paradox of conservative risk management: while it limits your potential gains on any single trade, it maximizes your long-term compound growth potential.
Example: The Power of Sustainable Growth
Starting capital: $10,000 Average monthly return: 3% (conservative and realistic with good strategy and risk management) Time period: 5 years
With consistent compounding:
- Year 1: $14,258
- Year 2: $20,327
- Year 3: $28,983
- Year 4: $41,317
- Year 5: $58,916
That’s a 489% return over five years with just 3% monthly growth. No hero trades. No gambling. Just consistent execution protected by disciplined risk management.
Contrast with the aggressive trader: Starting capital: $10,000 Target: 10% monthly (aggressive and unsustainable) Reality: Achieves target some months, but periodic blow-ups from poor risk management
Actual results:
- Months 1-4: Account grows to $14,641 (10% monthly)
- Month 5: Major loss due to poor risk management, account drops to $7,320
- Months 6-8: Rebuilds to $9,751
- Month 9: Another blow-up, account at $4,875
- Trader quits in frustration
Same time period, theoretically superior returns, but poor risk management prevented sustainability.
Implementing Your Trading Risk Management Strategy: A Complete Action Plan
Now that you understand why your strategy will fail without proper risk management, let’s build a comprehensive forex risk management system you can implement immediately.
Step 1: Define Your Risk Parameters
Before placing another trade, establish these non-negotiable parameters:
Account Risk Parameters:
- Maximum risk per trade: 2% of account value
- Maximum aggregate risk: 6% across all open positions
- Maximum daily loss: 4% of account value (stop trading for the day if hit)
- Maximum monthly loss: 10% of account value (stop trading for month if hit)
- Maximum drawdown: 20% from peak (return to demo if reached)
Position Parameters:
- Minimum risk-reward ratio: 1:2 (risk $1 to make $2)
- Maximum correlation exposure: 6% across correlated positions
- Position size calculation method: Fixed percentage (2% rule)
Write these down. Print them. Post them where you trade. These are your guardrails.
Step 2: Create Your Position Sizing Calculator
Never calculate position size manually during the heat of trading. Create a simple calculator (spreadsheet or use online tools) that automatically determines correct position size:

Position Size Formula: Position Size = (Account Size × Risk Percentage) / Stop Loss Distance
Example:
- Account: $10,000
- Risk: 2% ($200)
- Stop loss: 50 pips
- Required position size: $200 / 50 pips = $4 per pip = 0.4 mini lots
Your calculator should account for:
- Account currency vs. trading pair currency
- Current exchange rates for cross-pairs
- Pip values for different lot sizes
- Correlation adjustments for multiple positions
Step 3: Establish Your Stop Loss System
Your stop loss placement must be systematic, not arbitrary:
ATR-Based Stops (Recommended) Use the Average True Range indicator to place stops based on market volatility:
- Conservative: 2 × ATR from entry
- Moderate: 1.5 × ATR from entry
- Aggressive: 1 × ATR from entry
This ensures your stops adjust to market conditions—wider in volatile markets, tighter in quiet markets.
Support/Resistance Stops Place stops just beyond key support or resistance levels, ensuring you’re actually wrong about market direction before being stopped out.
Time-Based Stops If a trade hasn’t moved in your favor within a specific timeframe (e.g., 24-48 hours), close it. This prevents dead capital from sitting in non-performing trades.
Step 4: Implement Your Trade Journal System
Track every single trade with these minimum data points:
Pre-Trade Data:
- Date and time
- Currency pair
- Position size
- Entry price
- Stop loss level
- Take profit level
- Risk amount ($)
- Potential reward ($)
- Risk-reward ratio
- Strategy/setup used
- Market conditions
- Emotional state (1-10 confidence scale)
Post-Trade Data:
- Exit price
- Exit date/time
- Profit/loss ($)
- Profit/loss (%)
- Win/loss
- Was stop hit or target reached?
- Trade duration
- What worked?
- What didn’t work?
- Lessons learned
This journal becomes your diagnostic tool, revealing patterns you can’t see from memory alone.
Step 5: Weekly and Monthly Review Protocol
Risk management isn’t set-and-forget. It requires regular review and adjustment:
Weekly Review (Every Weekend):
- Calculate win rate for the week
- Analyze average win vs. average loss
- Identify any risk management rule violations
- Review correlation exposure across current positions
- Adjust position sizes if account has grown/shrunk significantly
Monthly Review (First Weekend of Each Month):
- Calculate all key metrics (Sharpe ratio, maximum drawdown, etc.)
- Analyze longest winning/losing streaks
- Review whether risk parameters need adjustment
- Identify any emerging patterns in losses
- Celebrate successes and learn from failures
Step 6: Build Your Emergency Procedures
Create written procedures for specific scenarios:
Losing Streak (5+ Consecutive Losses):**
- Immediately stop all trading
- Review all losing trades for common patterns
- Reduce position size by 50% for next 10 trades
- Only resume full position size after 5 consecutive winners
Procedure for Unexpected Major Loss (>4% on single trade):
- Close all other positions immediately
- Stop trading for 48 hours
- Analyze what went wrong (system failure, rule violation, black swan event?)
- Implement safeguards to prevent recurrence
- Return to demo trading before resuming live
Procedure for Hitting Monthly Loss Limit:
- Close all positions
- Withdraw remaining capital to prevent temptation
- Spend month in demo trading and education
- Only resume next month with fresh perspective
The Risk Management Trading Checklist: Your Pre-Trade Protocol
Before entering any trade, complete this checklist. If you can’t answer “yes” to every question, don’t take the trade:
Position Sizing Verification:
- Have I calculated exact position size using my formula?
- Does this position risk exactly 2% (or my defined percentage)?
- Is my total exposure across all positions under 6%?
- Have I accounted for correlation with existing positions?
Stop Loss Verification:
- Have I set a specific stop loss price?
- Is my stop loss based on technical levels, not arbitrary?
- Have I entered the stop loss in my trading platform?
- Is my risk-reward ratio at least 1:2?
Account Protection Verification:
- Will I still be within my daily loss limit if this trade loses?
- Will I still be within my monthly loss limit if this trade loses?
- Can my account survive 10 consecutive losses at this position size?
- Am I in the right psychological state to trade (no revenge, no greed)?
Documentation Verification:
- Have I logged this trade in my journal with all pre-trade data?
- Have I identified the specific strategy/setup being used?
- Have I noted current market conditions?
- Can I articulate why I’m taking this trade in one sentence?
If you can’t check every box, you’re not ready to take the trade.
Common Risk Management Mistakes and How to Avoid Them
Even traders who understand the importance of risk management trading make these critical errors:
Mistake 1: Moving Stop Losses to Avoid Losses
The Error: Trade moves against you, approaching your stop loss. Instead of accepting the loss, you move your stop further away, hoping the market will reverse.
Why It’s Devastating: You’ve just transformed a managed 2% loss into a potential 5%, 10%, or unlimited loss. You’ve abandoned your risk management entirely.
The Solution: Set stops in your trading platform immediately upon entry. Use “hard stops” that execute automatically. Never, ever move a stop loss further from your entry unless the trade has moved significantly in your favor first.
Mistake 2: The “This One’s Different” Syndrome
The Error: Your risk management rules say no to a trade (wrong risk-reward, too much correlation, daily limit reached), but you take it anyway because “this setup is too good to miss.”
Why It’s Devastating: Every rule you break establishes precedent for breaking more rules. Soon your entire risk management system becomes optional, and you’re back to gambling.
The Solution: No exceptions. Ever. If your rules say no, the answer is no. Miss the trade. If it bothers you that much, adjust your rules through your monthly review process—but never in the moment.
Mistake 3: Risking More After Wins
The Error: You have a few winning trades and start increasing your position sizes beyond your 2% rule because you’re “on a hot streak.”
Why It’s Devastating: Winning streaks end. When they do, your inflated position sizes transform a normal correction into a devastating drawdown.
The Solution: Position size is always based on current account value and your fixed percentage rule. When your account grows, your dollar risk grows automatically (2% of $12,000 is more than 2% of $10,000), but the percentage never changes.
Mistake 4: Ignoring Correlation Until It’s Too Late
The Error: You take multiple trades across different pairs without checking correlation, thinking you’re diversified when you’re actually concentrated.
Why It’s Devastating: One market event triggers simultaneous losses across all positions, creating losses far beyond your intended risk.
The Solution: Check correlation before every trade. Use free correlation matrices from broker platforms. Set maximum correlation exposure limits and stick to them.
Mistake 5: No Trade Management Plan
The Error: You have a great entry and stop loss, but no plan for what to do if the trade goes your way. You exit winners too early or watch them reverse into losses.
Why It’s Devastating: Poor trade management destroys your risk-reward ratio, transforming a potentially 1:3 winner into a 1:0.5 loser.
The Solution: Before entering every trade, define not just your stop loss but also:
- Initial profit target (minimum 2× your risk)
- Trailing stop strategy (when and how to move stops to protect profit)
- Partial profit-taking levels (if applicable)
- Time-based exit (maximum time to hold if no movement)
Advanced Risk Management Trading Techniques for Serious Traders
Once you’ve mastered the fundamentals, these advanced techniques will further refine your trading risk management:
The Equity Curve Trading Approach
Instead of trading continuously, trade based on the health of your equity curve:
When Equity Curve Is Rising (Above 20-period Moving Average):
- Trade full position size (2%)
- Take more setups from your strategy
- Aggressive implementation
When Equity Curve Is Falling (Below 20-period Moving Average):
- Reduce position size by 50% (1% risk)
- Take only your highest-probability setups
- Conservative implementation
When Equity Curve Is Significantly Below Moving Average:
- Stop trading entirely
- Review system
- Return to demo
This approach aligns your aggression with your actual results, not your hopes.
The Martingale Inverse Position Sizing
Traditional martingale (doubling position size after losses) is suicide in trading. But the inverse, scaling down after losses and up after wins, can enhance risk-adjusted returns:
After a Loss:
- Reduce next position size by 25% (risk 1.5% instead of 2%)
After a Win:
- Return to normal position size (2%)
After 3 Consecutive Wins:
- Increase position size by 25% (risk 2.5%, but only one position at this size)
This creates an automatic braking system during drawdowns and acceleration during winning periods.
The Correlation-Weighted Portfolio Approach
For traders managing multiple positions simultaneously, weight your positions inversely to their correlation:
Formula: Individual Position Risk = (Total Intended Risk) / (1 + Sum of Correlations)
Example: You want 6% total exposure across 3 positions:
- Position A correlation to B: 0.7
- Position A correlation to C: 0.5
- Total correlation factor: 1.2
Individual Position Risk = 6% / (1 + 1.2) = 2.7% each position
This mathematical approach ensures your true risk matches your intentions even with correlated positions.
Real-World Risk Management Success Stories
Let’s examine actual cases where proper risk management transformed trading results:
Case Study 1: The Comeback Trader
Background: John started trading with $25,000, read books on technical analysis, developed a breakout strategy that tested well historically.
The Failure: Within four months, his account was down to $8,000 (68% loss). He was risking 8-10% per trade, had no stop loss discipline, and held losers while cutting winners.
The Transformation: John stopped trading and spent three months studying risk management specifically. He implemented:
- Strict 2% risk per trade
- Mandatory stop losses placed at entry
- 1:3 minimum risk-reward requirement
- Daily and monthly loss limits
The Results: Starting again with $8,000:
- Month 1: +4% ($8,320)
- Month 3: +12% ($8,960)
- Month 6: +28% ($10,240)
- Year 1: +64% ($13,120)
- Year 2: +145% ($19,600)
Same strategy. Completely different results. The difference was entirely risk management.
Case Study 2: The Correlation Blindness
Background: Sarah traded multiple currency pairs simultaneously, proud of her “diversification.” She had a profitable strategy but kept experiencing mysterious account-destroying drawdowns.
The Problem: She regularly held 5-6 positions simultaneously, all heavily correlated:
- Long EUR/USD
- Long GBP/USD
- Short USD/JPY
- Long AUD/USD
When USD strengthened unexpectedly, all positions moved against her simultaneously, creating 15-20% drawdowns that wiped out months of gains.
The Solution: She implemented correlation tracking and a 6% maximum correlated exposure rule. She diversified across truly uncorrelated positions.
The Results: Her win rate didn’t change (still around 58%), but her drawdowns decreased from 20%+ to under 8%. Her annual returns improved from +12% to +34% purely from avoiding correlation disasters.
Frequently Asked Questions About Risk Management in Trading
What is the ideal risk percentage per trade?
The gold standard is 2% of your total account per trade. This allows you to survive 50 consecutive losses before account depletion. Conservative traders use 1%, aggressive but still professional traders might use 2.5%, but anything above 3% dramatically increases your probability of ruin. Never risk more than 5% under any circumstances.
How do I calculate position size for proper risk management?
Use this formula: Position Size = (Account Value × Risk Percentage) / Stop Loss Distance in Pips
Example: $10,000 account, 2% risk ($200), 50-pip stop loss = $200/50 = $4 per pip = 0.4 mini lots. Always account for currency conversions when trading cross-pairs.
What’s the difference between risk management and a trading strategy?
Your trading strategy determines WHEN and WHERE to enter and exit trades (your offense). Risk management determines HOW MUCH to risk and HOW to protect capital (your defense). A great strategy without risk management will fail. Mediocre strategy with excellent risk management can succeed. Both together create professional trading.
Should I use fixed dollar stops or percentage-based stops?
Percentage-based stops are superior because they automatically adjust to your account size. As your account grows, your stops grow proportionally. As it shrinks, your stops shrink, preserving capital. Fixed dollar stops can become either too small (as account grows) or too large (as account shrinks) relative to account size.
How do I handle correlation risk in forex trading?
Track correlation between your positions using correlation matrices (available free from most brokers). Set maximum exposure limits for highly correlated positions (typically 6% total). When taking a new position, check its correlation with existing positions and adjust your size accordingly. Never hold multiple positions in the same currency direction without accounting for correlation.
What should I do after a big losing trade?
First, close all other positions if you’re near your daily/monthly limit. Take a 24-48 hour break from trading. Analyze what went wrong objectively (rule violation? Black swan event? System failure?). Return to demo trading to rebuild confidence. Only resume live trading with reduced position size (50% normal) until you’ve demonstrated discipline with 5-10 consecutive properly managed trades.
Is it better to use tight stops or wide stops?
Neither is inherently better—your stops should be based on market structure and volatility. Use ATR-based stops (1.5-2× Average True Range) to automatically adjust to market conditions. Place stops beyond significant support/resistance levels so you’re only stopped when genuinely wrong. Stops too tight get you whipsawed; stops too wide risk too much capital.
How much total capital should I risk at one time?
Professional traders limit aggregate risk across all open positions to 6% maximum. This means if you have three positions open, you shouldn’t have more than 6% of your total capital at risk even if all three hit their stop losses. This prevents concentration risk from destroying your account during volatile market conditions.
Can I adjust my risk percentage as I gain experience?
Your risk percentage should be consistent based on your account size, not your experience level. However, you might use smaller risk (1%) while learning and increase to 2% once you’ve demonstrated consistent profitability over 6+ months. Never increase beyond 2-2.5% regardless of experience. Professionals with decades of experience still use 2% or less because mathematics, not skill, determines survival.
What’s the biggest risk management mistake traders make?
Moving stop losses away from entry after a trade moves against them. This single mistake transforms a managed 2% loss into an uncontrolled 10%, 20%, or 100% loss. Set stops when you enter the trade (when you’re rational and unemotional) and never move them further away. Only move stops closer to protect profit as the trade moves in your favor.
Conclusion: Why Risk Management Is More Important Than Strategy in Trading
We’ve covered extensive ground in this comprehensive exploration of risk management in trading, and if you take away nothing else, internalize this core truth: Your trading strategy determines your potential; your risk management determines your reality.
The evidence is overwhelming and incontrovertible:
The statistical reality: 90% of traders fail not because they lack knowledge of technical analysis, fundamental analysis, or market mechanics. They fail because they don’t implement proper trading risk management that allows them to survive their inevitable mistakes and learning curve.
The mathematical reality: The asymmetric nature of losses versus gains means that poor risk management creates holes so deep that even a profitable strategy can’t recover from them. Lose 50% and you need a 100% gain just to break even—a mathematical reality that destroys traders who ignore risk management.
The psychological reality: Without risk management rules, you’re trading on emotion, hope, and fear rather than systematic discipline. Every trade becomes a referendum on your self-worth rather than a probability-based business decision.
The longevity reality: Risk management is what allows you to survive long enough to develop the skills, pattern recognition, and emotional discipline that eventually lead to consistent profitability.
Think about the traders who’ve made it to professional status—hedge fund managers, institutional traders, consistently profitable individuals. What separates them from the 90% who fail? It’s not that they have secret strategies or indicators unavailable to retail traders. They have access to the same charts, the same information, the same markets.
The difference is discipline. Risk management discipline specifically.
They know that trading is a game of probabilities played over thousands of trades, not a series of individual battles to win or lose. They know that preservation of capital is more important than any single profit. They know that the ability to trade tomorrow is more valuable than maximizing today’s gains.
Your Risk Management Action Plan
Here’s what you need to do right now, today, before you place another trade:
Immediate Actions (Next 24 Hours):
- Write down your risk management rules (2% per trade, 6% aggregate, minimum 1:2 risk-reward)
- Create or download a position size calculator
- Review your current open positions for correlation risk
- Set up a basic trade journal template
This Week:
- Implement hard stops on every new trade at the moment of entry
- Calculate your current maximum drawdown from peak
- Review all trades from the past month for risk management violations
- If you’re currently down >20% from peak, return to demo trading
This Month:
- Track every single trade in your journal with full data
- Calculate your actual win rate and average win/loss ratio
- Identify patterns in your losing trades
- Implement the weekly and monthly review protocols
- Join a trading community focused on risk management (not strategy)
The Next Three Months:
- Prove you can follow your risk management rules for 100 consecutive trades
- Focus on consistency, not profit
- Build the habits that will carry you through decades of trading
- Adjust rules based on objective data, never emotion
The Uncomfortable Truth
Here’s the truth that most trading educators won’t tell you because it doesn’t sell courses: implementing proper forex risk management will likely reduce your profits in the short term compared to what you could make with aggressive, risky trading.
You won’t have those thrilling 30% monthly gains. You won’t double your account in a week. You won’t have hero trades that you can brag about.
What you will have is something infinitely more valuable: you’ll still be trading a year from now. Two years from now. Five years from now. While 90% of the traders who started when you did have blown up their accounts and quit, you’ll still be in the game, consistently profitable, systematically building wealth.
That’s the power of understanding that risk management is more important than strategy in trading.
Summary:
Professional traders think about trading completely differently than amateurs:
Amateur thinks: “How much can I make on this trade?” Professional thinks: “How much am I risking on this trade, and is the potential reward worth that risk?”
Amateur thinks: “I need to make back what I lost yesterday.” Professional thinks: “Each trade is independent. Past results don’t change today’s probabilities.”
Amateur thinks: “My strategy is 70% accurate, so I should risk more.” Professional thinks: “Even a 70% strategy means 3 out of 10 trades lose. My risk management must handle losing streaks.”
Amateur thinks: “Risk management limits my profit potential.” Professional thinks: “Risk management IS my profit potential because it keeps me in the game long enough to win.”
The transformation from amateur to professional isn’t about finding a better strategy. It’s about adopting the risk management discipline that defines professional trading.
You now have the knowledge. The frameworks. The specific rules and calculations. The case studies and examples.
The question is: will you implement it?
Will you accept that slow, steady, protected growth beats spectacular gains followed by account-destroying losses?
Will you embrace the discipline that seems boring compared to the excitement of high-risk trading?
Will you commit to the long game instead of looking for quick wins?
Your trading career—and your financial future—depends on how you answer these questions.
The market will still be here tomorrow, next week, next year. The opportunities will keep coming. The only question is whether you’ll still be here to take advantage of them.
Risk management in trading isn’t glamorous. It won’t make you feel like a market wizard. It won’t give you the adrenaline rush of all-in trades.
But it will do something infinitely better: it will allow you to survive, learn, improve, and eventually join the elite 10% of traders who actually make money consistently.
The choice is yours. Choose wisely. Your future self will either thank you for the discipline you demonstrated today or regret the recklessness you couldn’t overcome.
Trade smart. Manage risk religiously. And may your equity curve trend persistently upward.
About the Author
This comprehensive guide draws on decades of combined trading experience, behavioral finance research, and analysis of thousands of trader accounts to deliver actionable risk management strategies. The principles outlined here are used by professional traders at hedge funds, proprietary trading firms, and institutional desks worldwide. They represent not theoretical ideals but practical, proven approaches that separate consistent winners from the 90% who fail.
Remember: The market doesn’t care about your hopes, dreams, or how much you need to win. It only responds to discipline, probability, and proper risk management. Master these, and you’ve mastered trading.